16
Jan
12

Prototyping and Trying it out

I hope everyone is doing well this second week of Robot build season. Last week and possibly early this week everyone should have a chassis planned, a way to get up and down the field, and maybe some way to get the balls to a hoop.

But first, a lot of people are having trouble setting up the cRio and LabVIEW software. I’d like to suggest to RTM (Read The Manual). Most of the information is in the document at this link (https://decibel.ni.com/content/docs/DOC-20204)

On with prototyping: You don’t necessarily need to do everything in the game. If you’re a rookie team you might think about doing one thing very well. One thing that can be helpful is getting the balls from one end of the field to the other. Or you might play defense well, keep the balls from moving or have some type of shield that moves up to 84 inches to block shots.

No matter what, by now you should understand the game and how you plan on playing it.

When you know how you want to play the game and are designing your robot to play you should brainstorm on how to get your robot to do it. Prototyping is a way of trying out thing quickly before going to the time and expense of building it on your robot.

To prototype, decide what you are trying to test to see if it would work, quickly build something out of wood or plastic that is approximately what you want and try it. Sometimes parts are C-Clamped together or tied with rope.

One example is a couple of years ago on Breakaway, we were prototyping a ball kicker. First we rigged up some pneumatics on the kitbot, held a pneumatic cylinder by hand and punched the ball. It didn’t work well. We then screwed a frame down to the floor (Our Robot room is an old trailer), took some surgical tubing, rigged up a wooden kicker on a long meddle screw. We would pull the kicker by hand and see how well it would work.  We the switched the surgical tubing to pneumatics and tried it again. We liked the pneumatics the best. It took about 5 hours to try everything, we didn’t waste time building a full robot part to see if something worked or not, and we had a pretty good robot that could score from two-thirds of the field and move the ball the full distance.

Good luck to all

08
Jan
12

Sample Schedule for FIRST 3 weeks

Hey every one, due to work, I’ve been out of pocket for a while…But it’s Robot Season and time to really get down to the most fun work you’ll ever have.

Scroll to the bottom for Woodie Flowers presentatono from the kickoff.

To all the Rookie teams: One problem I’ve seen in the past is, teams that have never been through this get over whelmed easily. Between the robot build, reading the manual, and organizing the team with kids who have never been through this before either, time gets away from people. Teams will put off building the robot until the last minute. This is a huge problem because a robot is not built in a week. Here is a sample schedule for when things need to get done.

Please try not to stress out too much and remember there are people out there who can help. Look at FIRST event at the teams that will be at the event you will be attending and contact one of the veteran teams. They’ll usually help. Or contact your regional director, or contact me and I’ll see what I can do to help. I’m Joe Varnell, Engineer at Lockheed Martin, Technical mentor for Team 704, and my e-mail is frc704mentor@qweztech.com. I don’t want the rookie teams to get stuck. Also, don’t wait until the last week of the build to get help. Ask as early as you can.

Organize your team. There needs to be programmers, electrical people, frame/gear/build people (i.e. gear heads). Unless you have a large team, everyone will probably be doing a little of each. Plus, some kids may want to try it all so they can see what they are most interested in. There should also be a student team leader who knows what’s going on in the various parts. FIRST has information on organizing teams at this link (http://www.usfirst.org/roboticsprograms/frc/mentor-resources-library).

Week 1 – Figure out “What” needs to be done (Requirements) and “How” your robot will drive

Read the manual!!! This is probably the hardest part because there is a lot of other stuff to do and people, especially kids, want to get on with the robot building.

Analyze the game and the rules for the Robot. Figure out your drive train.

Brainstorm on what how you’re going to do things. Remember when brainstorming, no idea is a bad idea. Some ideas that seem to be “out there” may start other people thinking about different ways of doing things. Once you have a bunch of ideas, start narrowing them down to idea’s that can be implemented by you. You can also refine some of the ideas that have already been brought up.

Have the programmers start testing the sensor’s, learning the language, and running the example programs.

Find someone who can help with building using whatever materials are going to be used on the robot. Some teams will use aluminum, some use carbon fiber, possibly fiber glass, and many people used wood (Last year many teams used wood). A mediocre to good machinist can really help a team.

Week 2 – Continue design and prototype

Figure out what type of appendages and apparatuses you need to do the job you want and try some stuff. Issues that should be though about are things such as, this year is a shooting game, do you just want to dump balls in the lower basket? Do you catapult like arm to throw balls? Do you want something like a baseball pitching machine?

Build prototypes to test the designs. Prototyping is just rigging up something that is similar to what you want and seeing if it will work. You might use wood or PVC. Be safe while your prototyping, sometimes the apparatus need to be held together by hand while testing.

Begin building the chassis frame, put on the transmission, and figuring out where everything will go.

Week 3 – Build the drive train and continue to prototype.

Continue on with building the Chassis, putting on the motor’s, wheels and chains.

Finish up prototyping the appendages and apparatus. Once you get something decided for the apparatuses and start building it.

Good luck

PS Here is the link to the youtube video of Woodie Flowers from the 2012 kickoff. I thought it was very good.

28
Aug
11

Robot Pre-Season

I’ve long considered the summer as the Robot off-season. School is out, people (kids and adults alike) are honing their skills through summer camps, off-season events, and doing some self-teaching. Many kids out there have been participating in robot camps using Lego mindstorms which is a great some-what inexpensive way to learn about robots.

There have some off-season events for FIRST for teams to keep on their robot game. The FIRST FRC (FIRST Robotics Challenge) off-season events are a great way to meet and talk with other teams in not-quite of an intense setting as the FRC regional events. I was a volunteer at the Inaugural 2011 Texas Robot Round-up, which was my first (just a little pun intended) off-season event to participate in. Jess did a great job organizing it and AndyMark did a great job of supporting it.

This summer I was playing with my own small robot and working my way through the book Principles of Robot Motion. This is my off-season fun.

Many of the robot regular season events are listed at RobotEvents.com. FIRST FRC starts in January, but FTC (FIRST Tech Challenge) and FLL (FIRST Lego League) are kicked off on September 3 as well as BEST (Boosting Engineering, Science, and Technology). VEX kicked off their season at the end of last VEX robotics season at their Championships. All of these are great ways to get involved with robotics I want to encourage people to get involved in any one of these.

It’s the Robotics pre-season for a few more days, choose a side and get into the game. It’s worth it, both to the kids and for yourself.

09
May
11

Interesting FIRST

The robot’s this year varied widely as they usually do. The professional team’s robot’s looked sleek as ever and ran really well. [note: by professional teams, I just mean the teams with lot’s mentors, some may even be paid mentors for teams, and large budgets. I don’t mean the team was paid.] The robot’s built up from the kits were anywhere just the kit-bots to some pretty well put together bots on the kit-bot base.

Some of the more interesting robots used unconventional materials. I was most fascinated by the one’s that were made from wood. That’s one material that you don’t really expect to find on a robot. The robot for team 3350, the T-Bots, that I didn’t get a picture of had an elevator similar to a forklift, but built out of wood. It seemed to work well and they were picked in the alliance selection in Dallas.

This robot for team 922 had wooden gears. This is an unconventional use of wood that most probably would have never thought of. However, it seemed to work well. This is a great example of the “go with what you know” principle. If someone understands the properties of wood so that this can work and has the tools to make this, then go with what you know.
Here is a robot in which the tower is made of wood. It was built as a bridge like structure and it seemed to work pretty well. I know a lot of kids do the “bridge build” out of popsicle sticks. This is taking that principle and extending it to a stronger structure (than popsicle sticks) and putting it on a robot.

It just show’s that ingenuity and resourcefulness are a key to robot building. PVC was used a lot, however, not that effectively.

One more thing that’s not really robot related but is unuaual none the less was a ringer. I saw a lot of tubes get close but only one that made a ringer. The ringer was made at the Alamo regional and, while it could have received a penalty, since no mini-bot tried to use the tower, it didn’t seem to have been done intentionally, the refs though it was cool and so let it go.

02
May
11

FIRST Championships – FIRST is changing the world

It was a great year at the FIRST Championships in St Louis. This was my first time to volunteer at the FIRST Robotics World Championships. Between FLL, FTC, and FRC there were 29 countries represented.

Honestly, one of the most stirring things that happened was at the airport as I was leaving. I was waiting in the Security line and the teacher for an Israeli team was talking to gentlemen who just happen to be on the board of directors at FIRST. I overheard her say that they, the Israeli team, thought the whole world hatted the Israeli’s but at the FIRST competition, everyone welcomed them, were friendly, and worked together on their robots. There was no hatred, only Gracious Professionalism. It was a different experience for them and it was because of FIRST. FIRST is changing the world! FIRST doesn’t only stand for “For Inspiration and Recognition of Science and Technology” It also stands for “Forwarding International Relationships through Science and Technology”.

At the competition, I believe all had a good time and everyone came away a winner…some just had metals to show it. The competition went well; there were quite a few rookie teams there who had a great experience just being there. I know that FIRST rookie teams 3507 (Ubotics) and 3481 (BroncoBotz, FIRST Senior Mentor Mike Henry’s team) did pretty well, learned a lot, and had fun. They both plan on being back next year.

There was a concert given by the Black Eyed Peas and Willow Smith, Will Smiths Daughter. None of my pictures of that turned out because of the Dark Arena and Bright lights on stage. But that’s OK, the concert was great and I’ll always be able to see it in my memory!

Also, there was also a rookie score keeper on the Archimedes field.

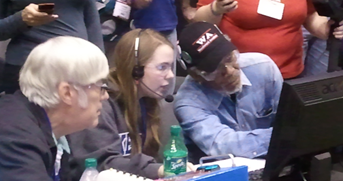
There was also a rookie score keeper on the Archimedes field. Morgan Freeman showed up during the finals matches. There was quite a stir with the entourage but we got through the matches. They invited him to sit in at the scorer’s table .
Morgan also took a spin on a Segway; I think his PR guy (or assistant) was a bit nervous that he may crash or fall off. However, Morgan did fine. While on the Segway, he just happen to run into Dean (not literally). So in the picture on the left, Dean isn’t really that much shorter than Morgan, Morgan’s just taller due to the Segway. Also, I apologize to Dean, for the “deer in the headlights” picture, it was just the best one I took of them together.

This was the first time I’ve volunteered at the FIRST World Championships and it was a great experience! Most of the volunteers knew each other and have been doing the Championships for years. I was welcomed and there was the typical FIRST friendliness. It was a great experience to work as an official scorer on the Archimedes field. I got to see the action up close. The reality was, it was about the same as a regional, but the atmosphere was certainly world championship and the level of robot play was well above the regional play. It was also good to see all the event people that I know from around Texas.

Well, I’m tired and I think I need to get caught up on rest. More later.

19
Apr
11

FIRST Book, Championship, Mentor’s and Sustainment

I’m hoping all went well during FIRST Robot Season. This was a great season, I think a lot of kids learned a lot things. I know I learned a lot from the kids.

I want to make sure everyone know about the book “The New Cool” by Neal Bascomb. This is a cool book about FIRST, I just got it and has just started reading it. However, I’ve talked with others who’ve read it and they all love it.

Also, the FIRST Robotics Championships are almost here, April 28 through April 30. Anyone who wants to see the best in FIRST robotics and what can be done in 6 weeks should see this. Or at least watch it on the web on the NASA website or TV on the NASA channel.

At least here in Texas I’m concerned about 2 things. In Texas, the state gave a lot of money to start new teams. However, I’m not sure how much thought they gave to finding technical mentors and to team sustainment. A lot of the teams are coached by science teachers that have no idea of the technical aspects of robots or the engineering behind them. Don’t get me wrong the teachers are great, dedicated teachers, but without the knowledge to build a good robot. Typically there are no plans after the initial frame build, no guide to help them show the kids how to move forward. There are 4 Engineering disciplines needed for a good robot. Some Engineers are knowledgeable in some of these but not all of these. I know a lot of the teams with Electrical or Mechanical Engineers don’t have the programming knowledge needed to make a good robot. The 4 areas are:

  1. Programming
  2. Electrical
  3. Mechanical
  4. Project Management

Project management isn’t really an Engineering discipline, but engineers, as well as robotics coaches, need to know about project management.

The other concern with the Texas FIRST money is team sustainment. There is a lot of money out there for rookie team startup but after a couple of years, the team has to find sponsors and do fund raisers for the team money. In this day and age, education funds are drying up and corporate funds for projects like FIRST are drying up. Teams need to be creative to do this.

Over the next months, I’m going to see what I can do to find resources for Engineering mentors or at least some way to learn what’s needed to build a good robot, as well as, what to do about team sustainment.

24
Feb
11

FIRST Competition Season

FIRST Robot build season for 2011 is complete and now it’s on to the FIRST Competition season. Starting March 3rd the FRC events begin, time for your robots to pucker up…assuming you put that feature on your robot.

I’m going to be a volunteer at the San Antonio FIRST Regional event. I’m going to be working Field Technical stuff. I would appreciate it if anyone is there would drop by and say hi. Since you don’t know my face, ask where Joe Varnell is; that’s me.

I’ve had several rookie teams ask “What should I expect at the competition?” Here are a few things to think about beforehand:

  1. Make sure you bring safety glasses and gloves. All the competitions are fairly strict on wearing safety glasses in the pits.
  2. Be prepared to work on or fix your robot! Bring tools, tie wraps, extra parts in case your robot breaks, duct tape (which is good for everything)
  3. One good idea is to bring ice chests with food for lunch. A lot of teams will be outside having lunch and relaxing during lunch. It’s also cheaper that way.
  4. Read the rules on what to bring. You’ll need a bill of goods, a list of items on your robot that didn’t come out of that years kit.
  5. Bring a long Ethernet cord. They don’t allow wireless communication in the pits so you need to tether your robot in the pits.
  6. Be prepared to keep your batteries that you are not using on the charger. This is so you can have a fresh battery for every match.
  7. Have a banner to display your team number, team mascot, and your sponsors. You should always support your sponsors.

At the competition, on Thursday, be prepared for:

  1. Robot weight in. After you get your robot unpacked and put together you’ll need to get it weighed in and sized. The weight is without the battery or bumpers.
  2. Access point setup. You’ll have to take you white access point off your robot to be setup with the WPA for the competition. This is so it will communicate properly with the Field Control System (FCS)
  3. Robot inspection. Robot inspectors will come around to your pit and verify your robot meets the spec’s from the robot manual. Some of the top things they check are bumper height and that they meet bumper specifications. Also, the pneumatic pressure is 120 psi max on the storage tank side and 60 psi on the solenoid side (make sure you read the pneumatics manual). The electronics power will be checked and probably that the driver station shows the battery voltage. (this is done by powering the analog bumper and putting a jumper on it)
  4. Try to get out on the field for a practice match. This will let you see how matches are run and what to expect.
  5. Don’t be afraid to ask for help. This is important. If you’re having problems, don’t struggle to long. Ask a more experienced team, mainly those with numbers under about 3000 or teams with robots that look really well put together. Also, there will probably be some experts there who can help the teams.
  6. There will also be a practice field somewhere to test your robots operation.
  7. There will also be a machine shop in case you need parts worked on.

On Friday and on Saturday morning are the qualifying rounds.

  1. Be prepared to answer the judge’s questions. There will be judges in blue shirts walking around asking questions. They are judging various categories and there should be students around (except during matches) to answer questions.
  2. Get your robot to the robot queue when it’s called. Look at the match schedule and see about when your matches are. Also, listen for your team number to be announced and get to the field quickly.
  3. Make sure you have time to look around and to watch other teams. This will give you ideas for next year.
  4. Talk to the veteran teams and make friends with them. The next year you can probably go out to other teams and see how they operate.
  5. Before your matches, talk with the other teams you have alliances with. Be a team player and plan your strategy. Learn each of the alliances robots strengths and weaknesses and plan what each team should be doing.
  6. Because of the random alliance parings, even rookie teams have a chance to be in the finals.

Saturday afternoon are the finals.

  1. The top 8 teams will be picking alliance partners, be prepared to pick just in case you make it to the finals. If you are choosing alliance partners and don’t know who to choose, the team rankings will be on the screen (probably behind you). Look at that and pick the top numbered team on the list.
  2. The rules of how to alliance pick will be explained. However, if you don’t understand then ask someone.
  3. If you are in the finals, have fresh batteries ready to go. Make sure your batteries are charged. The finials are fast paced.

I’ve probably left out some things and I apologize for that. There will be a lot going on, don’t let it overwhelm you.

In a nutshell, this is what will go on. My closing advice is to get plenty of sleep, be friendly, eat breakfast, talk to other teams, and, above all, HAVE FUN! It will be hardest fun you’ve ever had.

13
Feb
11

Mentoring and using LabVIEW and Joystick buttons

First I want to share the FIRST in Texas blog on FIRST mentoring. I’m very dedicated to FIRST and helping kids learn about Science, Technology, and Robotics. I also have a lot of fun mentoring and blessed to be able to help.

Next, it’s drawing near the end of the robot build season and time is getting tight. I’m hoping everyone is getting close to getting done or at least has a plan on getting done. With most teams, as in real engineering, the programming is getting done last. Even though the programming is getting done last you still need to test it before you get to the events.

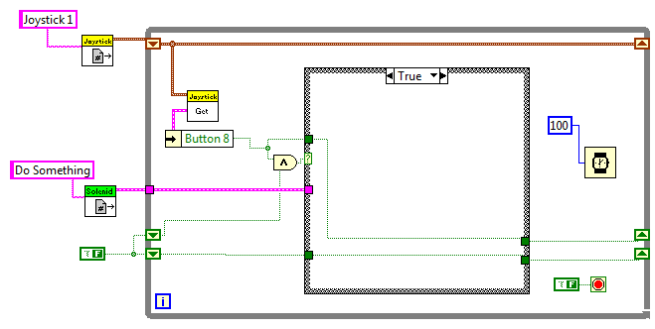
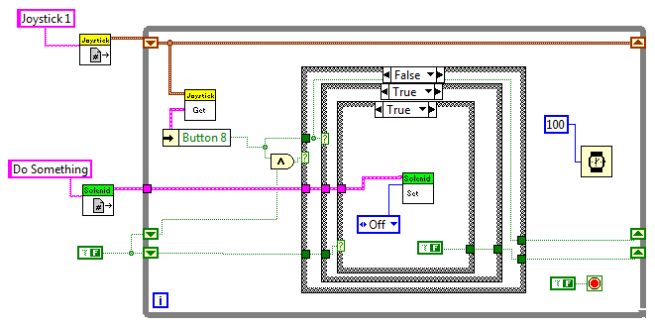
One thing that I’ve found very useful is a way to hit and release a button and cause an action. Then later hit and release the same button and cause the opposite action. For instance, you hit the button to close the grabber and the same button to open the same grabber. Below is one way to do it, using button 8 of the joystick to control a solenoid. All the figures below are the same while loop showing the different case structure code.

Figure 1 is the diagram for the case where the button is still pressed after the processing has happened. The case structure is true when the button is pressed and the last time through the processing the button was also pressed.

Figure 1

Figure 2 below is when the button is not pressed. The result is false and no processing is done. The button is not pressed AND the last time through the processing the button was not pressed.

Figure 2

In figure 3 below, the button has been pressed and it’s first time through the loop to do the operation. This shows the processing when button was pressed AND last time through the processing the button was not pressed. This is when the actual operation is done. The innermost case statement is where the solenoid operation is done. In this case the last operation on the solenoid was turned on and the operation had been set to true. In the inner case statement it’s set to false this time so that next time the solenoid will be set opposite it currently is.

Figure 3

The false case of the innermost case statement would be opposite of figure 3, the solenoid would be turned on and a TRUE sent out. Also, the joystick and solenoid would need to be initialized in the begin.vi.

This vi would allow the opposite operation be done each time the button is pressed. There may be easier ways to do this by the NI folks, but this is the solution I came up with. I hope this helps.

31
Jan
11

FRC – Analog and Digital Sensors

Sensors can really help with robot performance. There are several sensors that come in the Kit Of Parts (KOP), limit switches, the encoders (2 kinds), IR sensors (for line following), gyro, camera, and accelerometer. There are several different ways these sensors interface with the computer. Some through communications protocols such as TCP/IP that the camera uses or I2C protocol that some of the Lego Mindstorms sensors use. There’s also a digital interface used by the Quadrature wheel encoder and the limit switches and an analog interface used by the gyro and the magnetic wheel encoder. I’m going to focus on the the two simplest, digital and analog sensor interfaces.

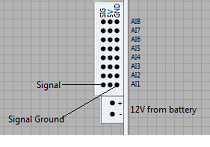
A lot of the analog and digital sensors use a 3 pin interface. There is a ground (minus) and 5 volt (plus) pins to provide power to a device. The third pin is a signal. On the analog input the signal pin accepts voltages between 0 and 10 volts. On the digital input, it accepts a voltage between 0 and 6 volts. If the voltage is above 3.2 volts (I think) a “1” is read and below 3.2 volts a zero is detected.

The Analog bumper is shown but digital side car has the same pin out.

As long as any sensor you have is 5 volt you can wire the 5 volt sensor line to the 5 volt pin on the analog or digital interface, the ground to the GND pin (minus) and the signal line to the SIG pin, the sensor should work. Note that if you get the ground and power lines backwards, the sensor may burn up. In other words, be careful about wiring and look for black spots on the chip or a funny smell after you hook it up.

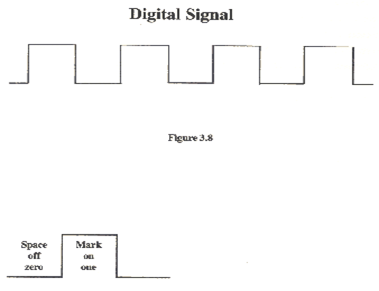
A sensor that uses a digital interface basically sends an on/off signal. Limit switches are the best example. When the limit switch is closed, a one can be read by the computer. When the switch is open, a zero is read. Limit switches are good for checking the end of a mechanical movement or when something is in place like a scoring piece. The quadrature encoder sends digital signals for each rotation to the digital sidecar. This creates a pulse stream as shown in the diagram. By counting the digital signals, the computer can tell how far the robot has traveled. That’s basically how the LabVIEW encoder blocks work.

Analog sensors send out a voltage that can be measured by the analog module on the robot. Analog sensors such as distance sensors will put out a voltage based on the distance an object is from the sensors, the closer the object the more voltage the sensor puts out. If you know how much voltage is put out per inch, the distance can be figured out by multiplying the distance per inch with the voltage. The gyro puts out a voltage as the gyro is turned.

If you read the data sheet on a sensor it should say if it’s analog or digital, what pin is for power, what pin is for ground and what pin is the signal. Almost any sensor for analog or digital should be able to be used fairly easily. If you have any questions about sensors or about other robot issues you can e-mail me at frc704mentor@qweztech.com. Good luck.

23
Jan
11

FRC build week 2 musings

I hope everyone’s Robot planning is going well. I’m also hoping all the teams have their strategy down and have a plan to fit the Robot to the strategy. Make sure whatever strategy is chosen is done well. If it’s a defensive strategy make sure the Robot is built to push other Robots around or to be the best blocker possible. If you have a scoring robot, make sure you can score quickly and efficiently.

The Kit Of Parts (KOP) came with many sensors, everyone should try to make use of them where they can. The sensors can be used to aid the driver in Robot operation and to help in autonomous mode. Some of the sensors like the wheel encoders can let you know the distance you move. The linear encoder can help the Robot tell the distance an actuator moves. The gyro can help your robot tell which direction it is pointing. All the sensors have examples that are runnable. To get to them, open LabVIEW and in the lower right hand corner of the opening screen are the FRC examples. All examples have diagrams of how to hookup the sensor. Also, all the data sheets are located on the site http://www.usfirst.org/roboticsprograms/frc/content.aspx?id=18530. Make sure you scroll down.

Right now is a very important time in the build, some parts of the Robot are coming together well, some parts are not coming together and are in need of redesigned. Don’t get discouraged, just keep working at it. There are only four weeks left in the build season but it is plenty of time to get things together.

One thing people should think about is Prototyping. Prototyping is to build a quick and dirty model of whatever you are prototyping. One example is the kicker on last year’s robot. We (team 704) built a wooden frame, screwed it down to the floor and then used different things to kick a soccer ball. We made a kicker and tried various pneumatics, surgical tubing, and bungee cords. We made prototypes of different ways to kick a soccer ball. This year you might prototype various ways to put the game pieces on the scoring pegs. Come up with a way to score the game pieces and build something to try out your ideas.

It’s important to get your robot to a point you can test it before the ship date. Getting out there and running it through its paces is a key to success. Last year’s FRC challenge contained humps the robot had to go over. Our robot was ready somewhat early (a week early) and so we did some testing on a practice field.

During testing last year, after a couple of test runs our chains started to fall off and this bent axle is what we discovered. This along with a torn aluminum pan holding the battery. You don’t want to find out about this during the competition.

Good luck to all. Figure out what to do and do it.


May 2024
M T W T F S S
 12345
6789101112
13141516171819
20212223242526
2728293031