I’m not an expert with the Robot Code, the default code everyone gets with the kit-bot, but I do understand it. The code I’m going to write about is from last year’s FIRST LabVIEW installation. I’m assuming that the default code we get this year will be about the same, with the same basic parts. After the kickoff in January, I’ll see if there are any differences and write about them.
Now, on to the Robot code. First there is a document from NI that gives a description of the Robot code, or the FRC framework as they call it. It explains a lot about how the robot code works. It’s a good reference and I assume the will be another for the coming up Robot season.
Below is the block diagram of the overall Robot code for last year kit-bot.
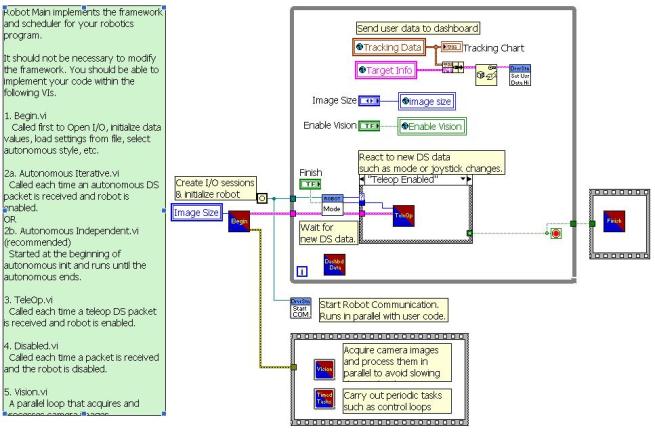
The flow of the code is from left to right starting with the Begin Vi. The Begin Vi is where you initialize all of the operations you will be doing. In the upper center is the main While Loop that will run until the robot mode changes to Finish. Once that happens the “stop” will be activated (the little red stop sign with a green wire going to it) and the Finish Vi will execute. The Finish Vi closes all the operations that were opened in the Begin Vi. Just a note, even if you don’t close everything in the Finish Vi, when you turn off the robots power, it shuts off anyway.
Near the bottom of the while loop there is a block that says Dashbd Data. This block collects data at a slow pace from the robot and prepares it to be sent back to dashboard on the Classmate netbook. When you see the display change on the Classmate, this is what’s gathering the data. At the top of the loop is where the high priority data is sent back. Most of the time you won’t do anything with these.
In the middle is a case structure that is a state machine like I talked about a couple of weeks ago. This is where the meat of the operations that you will be mostly concerned with. Base on the Robot mode, which comes from the Field Management System (FMS) through the netbook, the state of the match is fed into the case structure. There are 5 cases Timeout, Autonomous Disabled, Autonomous Enabled, Teleop Enabled, and Finished.
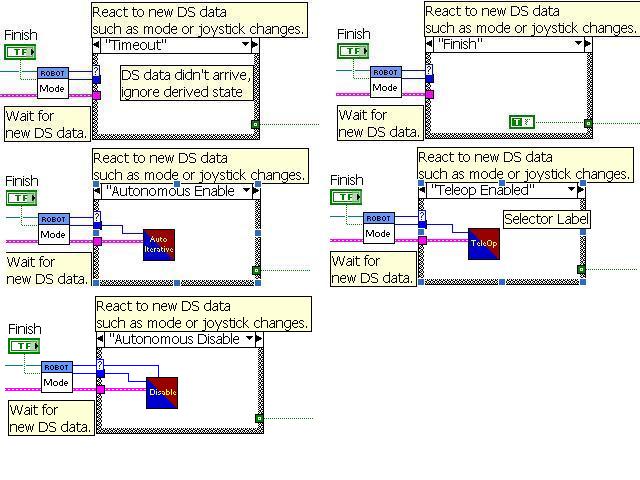
Timeout case – no data has been received from the netbook and nothing happens on the robot. Notice there is nothing in the Timeout case above.
Autonomous Disabled – this is the case for after the Robot has been powered up and before the match starts. In the Disabled Vi, shown about, you would do operations while waiting on the match to start. Things like reset your gyro or maybe some type of calibration on sensors.
Autonomous Enabled – This case is once the match enters autonomous mode. There are two types of autonomous mode, iterative and independent. This is what you would modify if you were doing Autonomous iterative (this attribute is set in the Begin block)
Teleop Enabled – This case has the direct control from the driver. It gets information from the joy stick and sends it to the motors. This is another place you would modify for driver operations
Finish – The case for the end of the match. It has a true coming out of it to end the main while loop.
Back in the Robot Main there is a Start COM block. This is where all the information is retrieved from the netbook. It has a while loop in the block and so it runs in parallel with the main processing loop, in other words it runs at the same time.
Also below the main processing loop is a sequence structure with 2 blocks in it, Vision and Timed loop. The Vision block contains the code to process the camera image. If you want to process the image to, say, look for a color, you would modify this block. For last year’s game it was looking for the target above the goal.
There is also a Timed tasks block. Each loop in this Vi is not connected to the other block so they each run independent of the other. There is a timer in each to make each run at a different speed. In these loops you would put things like reading a joystick button and doing an action like a kick. Remember, that any blocks put outside the loops will only execute once. Anything you want to run over and over needs to go inside the loop.
I’ll help with how some of the sub Vi’s, such as Begin Vi and Autonomous Iterative Vi, from Robot main work. Remember, get the old robot out and try to add new code and see what happens.
